tp
Developer Guide

Table of Contents
Acknowledgements
We referenced AddressBook_Level3 by using their User Guide and Developer Guide to help us structure our own documents.
We used PlantUML integration plugin to help us create our diagrams.
We used PlantUML webpage to understand PlantUML syntax.
Design
Architecture
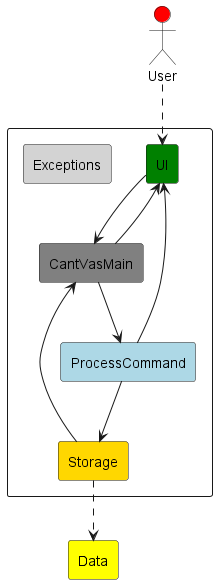
The Architecture Diagram above explains the high-level design of CantVas.
Given below is a quick overview of main components and how they interact with each other.
Main components of the architecture
CantVasMain is in charge of the launch and shut down of CantVas.
The bulk of the app’s work is done by the following three components:
UI: The UI of CantVas, in charge of interactions between the user and CantVas.ProcessCommand: Parses user input and executes the command.Storage: Reads and write data to the respective text file for each feature.
Exceptions represents the exceptions used by other components.
UI
API: UI.java
How UI works:
- Reads in user input and send the command to
CantVasMainfor parsing and execution. - Prints an output based on user input.
- Reads in user input for steps in GPA calculator.
Diagrams
Class Diagram
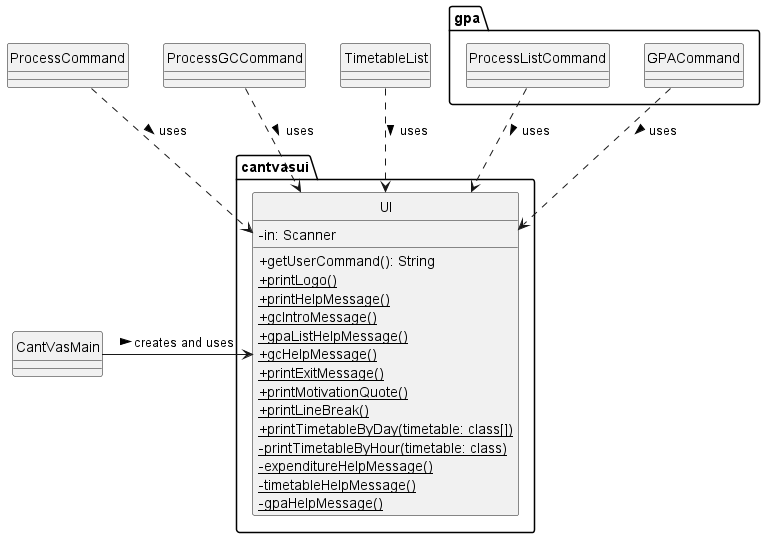
The class diagram above illustrates that CantVasMain instantiates the UI class,
while other classes have dependencies on UI, as they utilize its methods.
Sequence Diagram
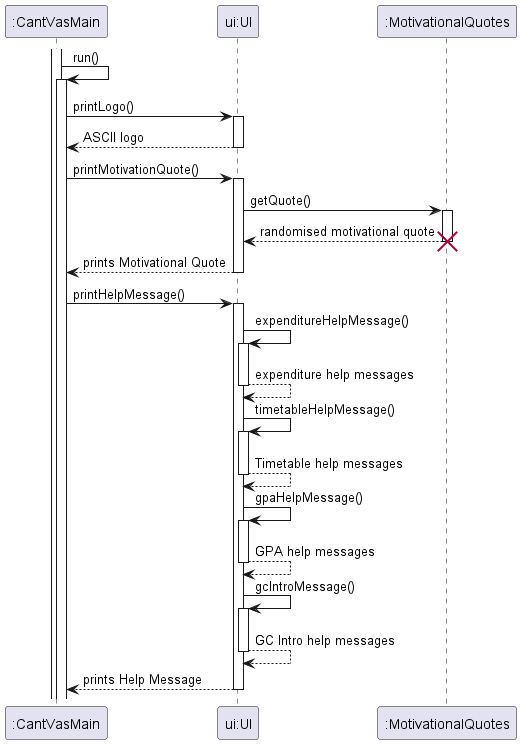
The Sequence diagram above illustrates the interaction between CantVasMain and UI when the program starts.
ProcessCommand
API:
ProcessCommand.java
How ProcessCommand works:
CantVasMainreceive the user input fromUIand passes it toProcessCommand.- Depending on the type of command,
ProcessCommandpasses the command toprocessExpenditureUserCommandorTimetableParserif the command is for expenditure and timetable to further parse the command.GPACommandorProcessListCommandfor GPA calculator to receive more user inputs.
- Returns true to
CantVasMainwhen theexitcommand is entered, ends CantVas.
Diagrams
Class Diagram
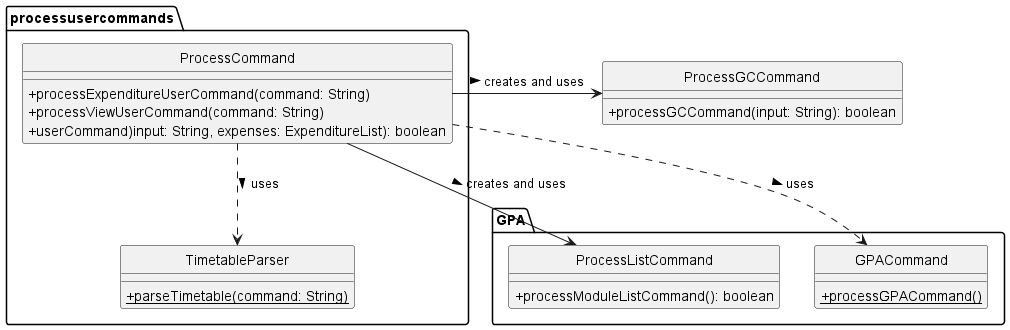
The class diagram above showcases the various classes leveraged by
ProcessCommand to facilitate its task of parsing and executing commands.
Sequence Diagram
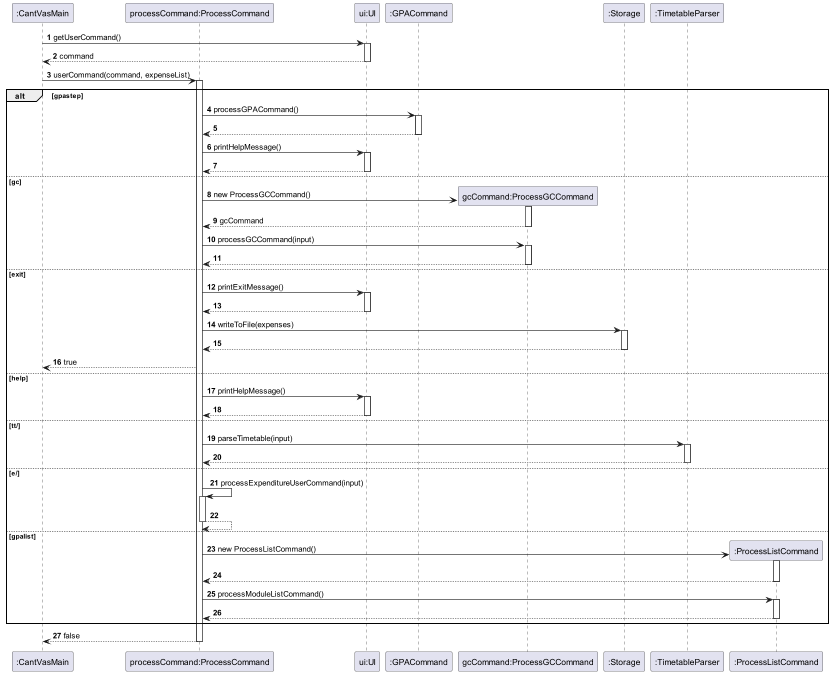
The sequence diagram above illustrates how user input is parsed
and executed when passed to ProcessCommand.
Storage
API: Storage.java
How Storage works:
- Saves expenditure list, timetable list and gpa list in its respective text file. All text will be in a folder called data for easy location.
- When
ProcessCommandreceives theexitcommand,Storagewrites expenditure and timetable lists to their respective text file for saving. Storagewill instantiate ExpenditureList, TimetableList and ModuleList to store data read from the text file before passing it to other classes.- If a text file or the data directory is not found when trying to read,
Storagewill create a new file/ directory and return an empty list to the caller. - Reads in data from text file and process the data into strings to pass into
addExpenditure,addModuleandaddClassmethods. PrintWriterandFileandScannerclasses are responsible for the writing, opening and reading from files respectively.
Diagrams
Class Diagram

The class diagram above illustrates the classes that is associated or is dependent on Storage.
Exceptions
API: InvalidInputFormatException.java
How Exceptions work:
- Throws an error message when the user enters an input that has the wrong format and the user will be informed about their wrong format.
- Takes in an error message when thrown that can be printed.
Back to table of contents
Implementation
Expenditure Tracker
The Expenditure Tracker simplifies expense tracking, allowing users to log daily spending. With filters for month, year, and type, it aims to promote financial awareness, aiding informed decision-making for better financial health.
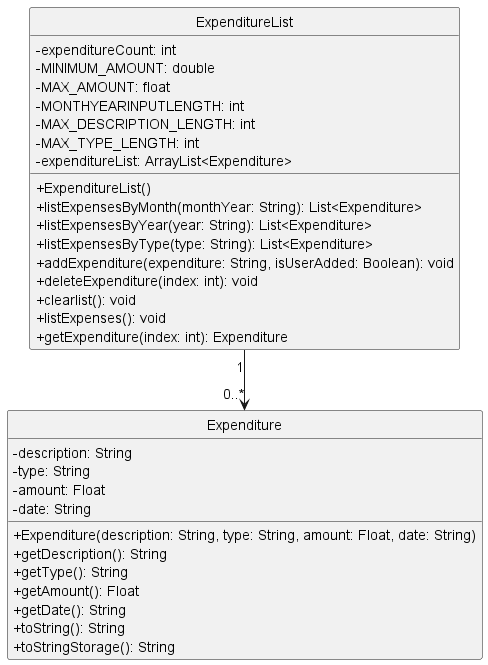
The ExpenditureList class is responsible for managing a collection of
expenditures. It provides methods for adding, deleting and listing expenditures.
The Expenditure class represents individual expenditure instance within the system.
Each expenditure object contains key attributes such as description, type, amount and date.
The class diagram below illustrates the relationship between ExpenditureList and Expenditure class.
Class Diagram
How Expenditure works:
- When a new expenditure is added,
ExpenditureListcreates a newExpenditureobject with the provided details and adds it to the expenditureList. - When an expenditure is deleted,
ExpenditureListremoves theExpenditureobject at the specified index from the expenditureList. - When expenditures are listed,
ExpenditureListiterates over the expenditureList and calls the toString() method of eachExpenditureobject to get a string representation of the expenditure. - When expenditures are listed by month, year, or type,
ExpenditureListfilters the expenditureList based on the specified criteria and returns a new list ofExpenditureobjects that match the criteria. - The isValidDate(), isValidMonth(), isValidAmount(), isValidType(), and isValidDescription()
methods in
ExpenditureListare used to validate the details of an expenditure before it is added to the expenditureList.
Add expenditure
Allows user to add a new expenditure to the expenditure list, it is optional for the users to specify a type, the type would be left as NA should they choose not to add a type.
Format without type: e/ add/ d/ <description> amt/ <cost> date/ <dd.mm.yyyy>.
Format with type: e/ add/ d/ <description> t/ <type> amt/ <cost> date/ <dd.mm.yyyy>.
SequenceDiagram
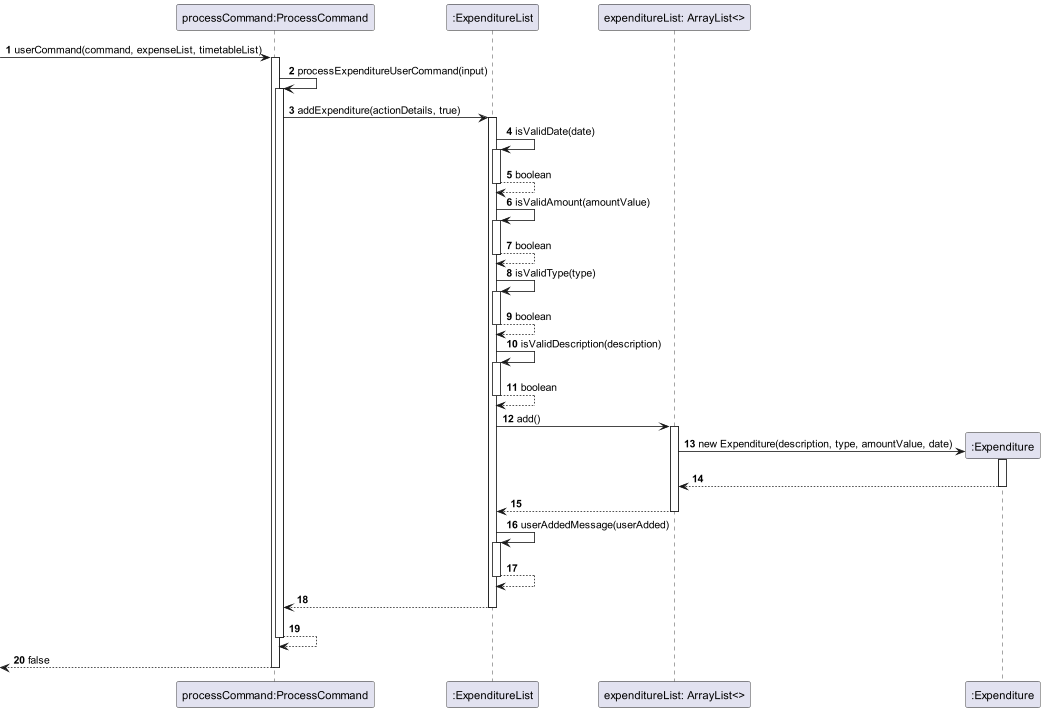
The sequence diagram above illustrates how ExpenditureList goes about validating user input
and adding the new expenditure.
Design Considerations:
Aspect: How add expenditure with and without type is handled in processCommand.
- Alternative 1 (Current Choice): As an optional input in add expenditure.
- Pros: Minimal Changes - Modifying the existing method requires fewer alterations to the codebase.
- Cons: Risk of Misuse - Users might overlook the optional input, leading to incorrect or incomplete data entry.
- Alternative 2: A new method just to handle add expenditure with type.
- Pros: Enhanced Validation - A dedicated method can enforce stricter validation rules for expenditures with type.
- Cons: Complexity - Introducing a new method adds complexity to the codebase.
Viewing all expenditures:
Allows user to view their whole expenditure list.
Format: e/ list/.
SequenceDiagram
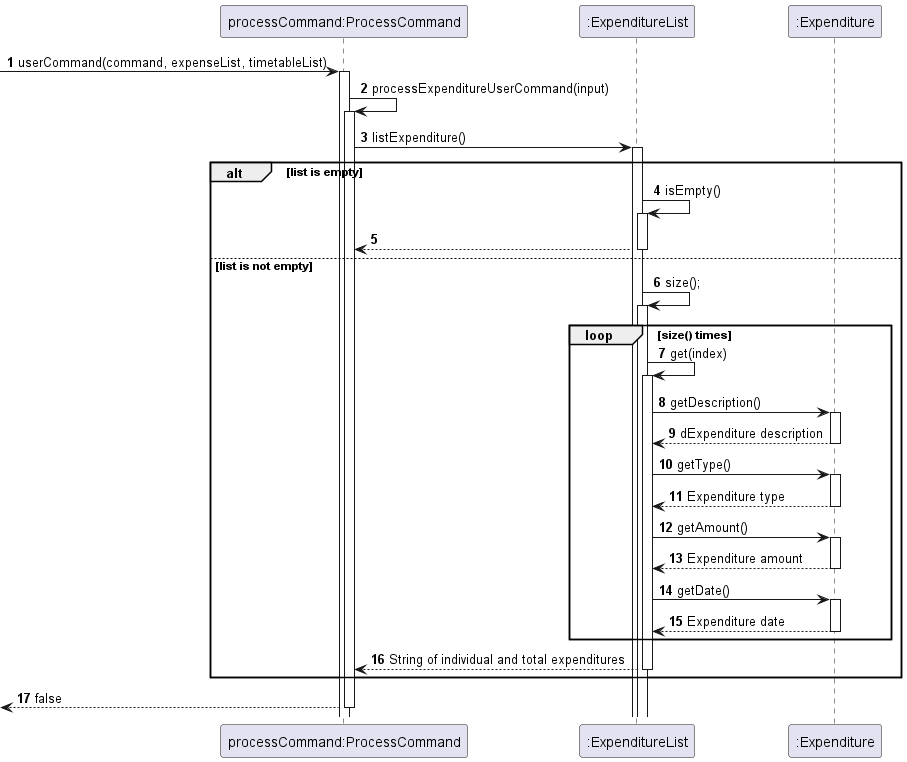
The sequence diagram above illustrates how ExpenditureList retrieve the information from
Expenditure to print the list.
Viewing expenditures by month:
Viewing an expenditure in numerical form, filtered by month.
Format: e/ view/ m/ <mm.yyyy>.
View expenditure by year:
Viewing an expenditure in numerical form, filtered by year.
Format: e/ view/ y/ <yyyy>.
View expenditure by type:
Viewing an expenditure in numerical form, filtered by type.
Format: e/ view/ t/ <type>.
SequenceDiagram
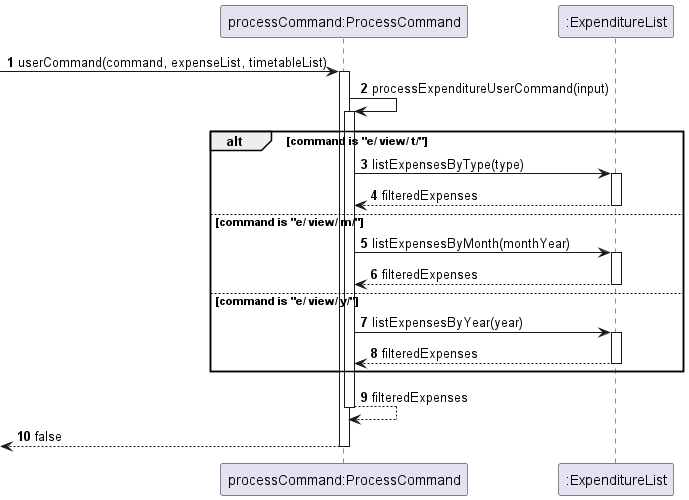
The sequence diagram above illustrates how ProcessCommand determines which method to call in ExpenditureList.
Delete expenditure:
Deleting an expenditure in numerical form, by referencing its index in the array.
Format: e/ del/ <index>.
SequenceDiagram
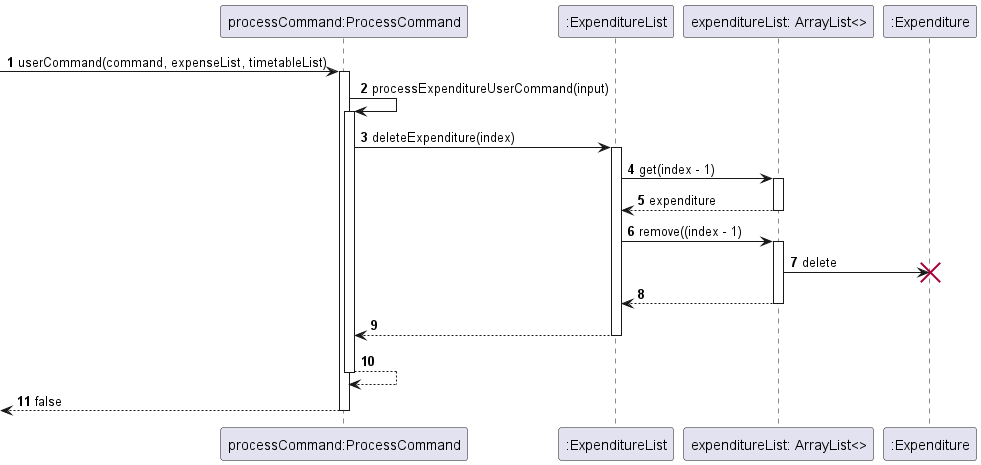
The sequence diagram above illustrates how the Expenditure object is deleted from the list.
Back to table of contents
GPA Calculator
The GPA Calculator Module is a comprehensive component designed to facilitate the calculation of a user’s updated GPA based on their current academic standing and projected module grades. This guide will walk developers through the architecture, functionality, and core components of the module.
Overview
The module is divided into 5 classes dealing with 2 different calculation methods.
Class Diagram
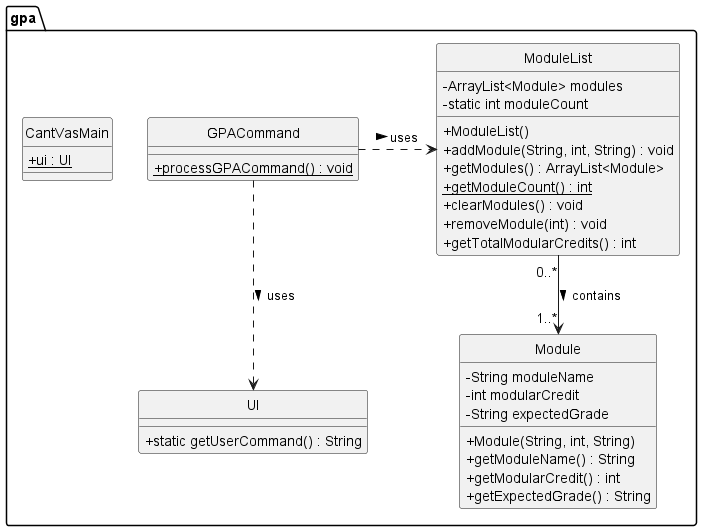
ModuleList and Module: The diagram shows a composition relationship between ModuleList and Module, denoted by a solid diamond and a line. This indicates that ModuleList contains Module instances and manages their lifecycle. The “0..*” next to Module implies that a ModuleList can contain zero or more Module instances.
Module
Handles user input of module information: module name, module weightage and module grade.
Here we demonstrate the Sequence Diagram with sample input CS1010 with 4 MC and A grade.

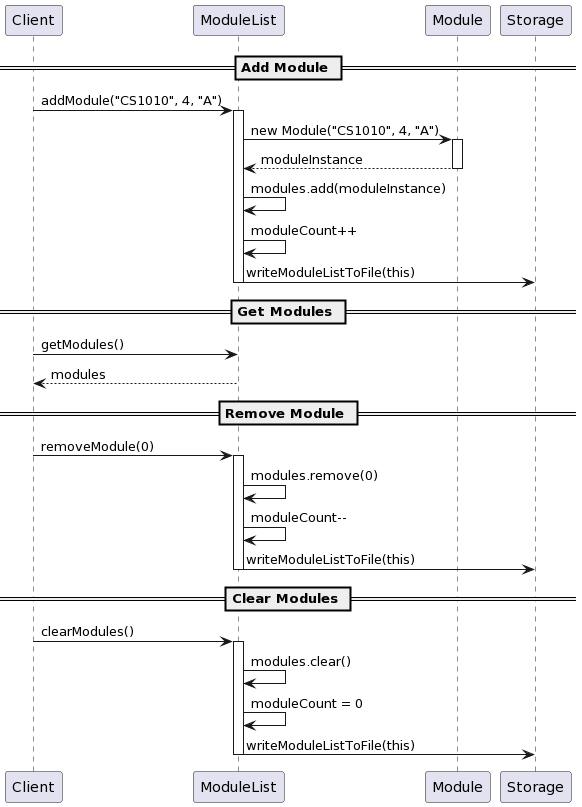
ModuleList
This extends Module class, which is used to execute actions like add/delete/view regarding the module list.
Here we demonstrate the Sequence Diagram with sample input CS1010 with 4 MC and A grade.
GPACommand
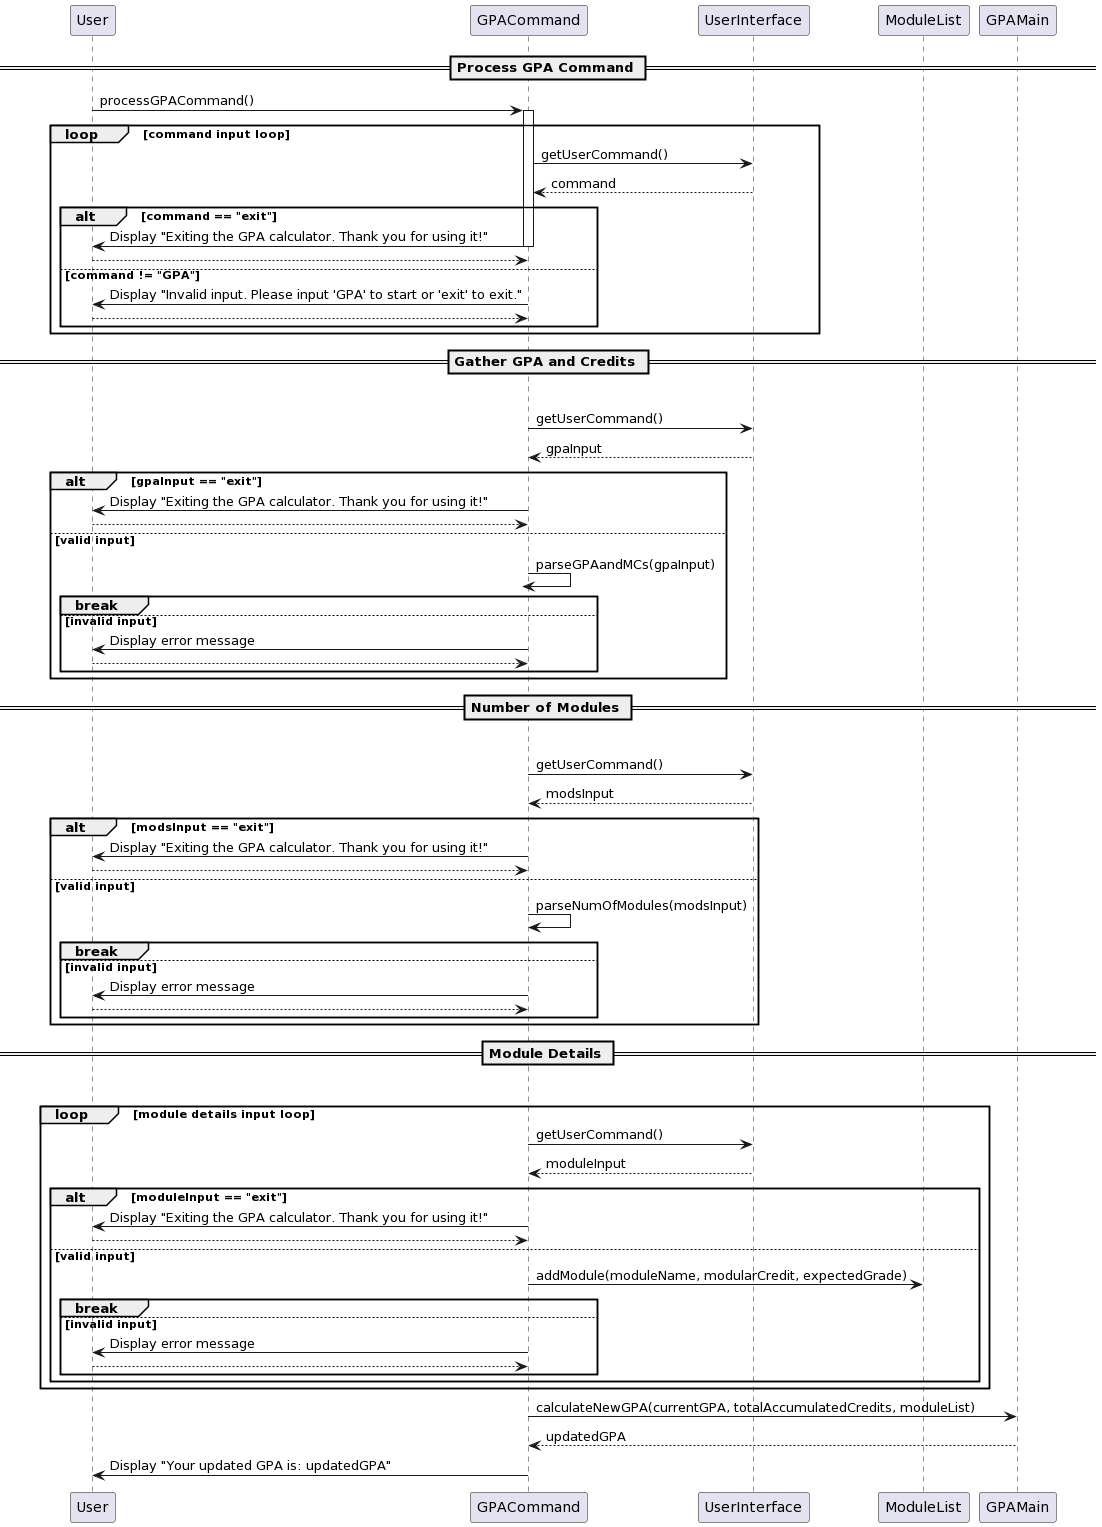
This class is responsible for interacting with the user, collecting inputs, and managing the flow of the GPA calculation process. It operates within a loop, allowing the user to perform multiple calculations or exit at any point.
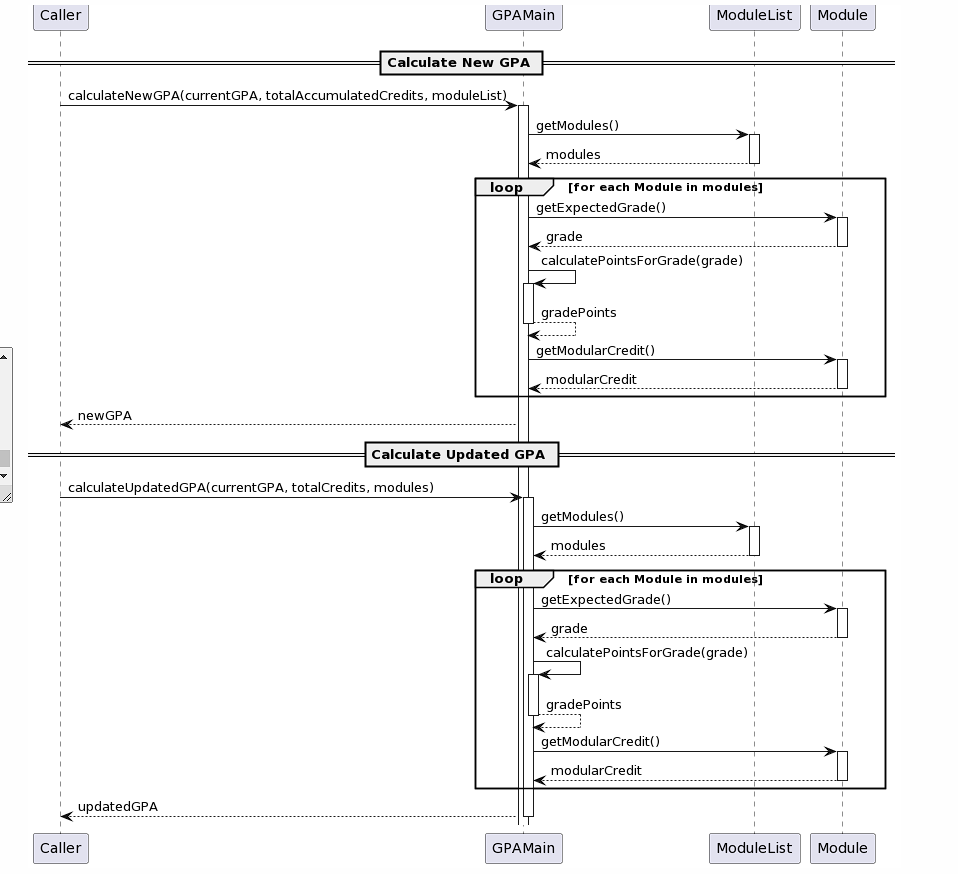
GPAMain:
Contains the logic for calculating the GPA.
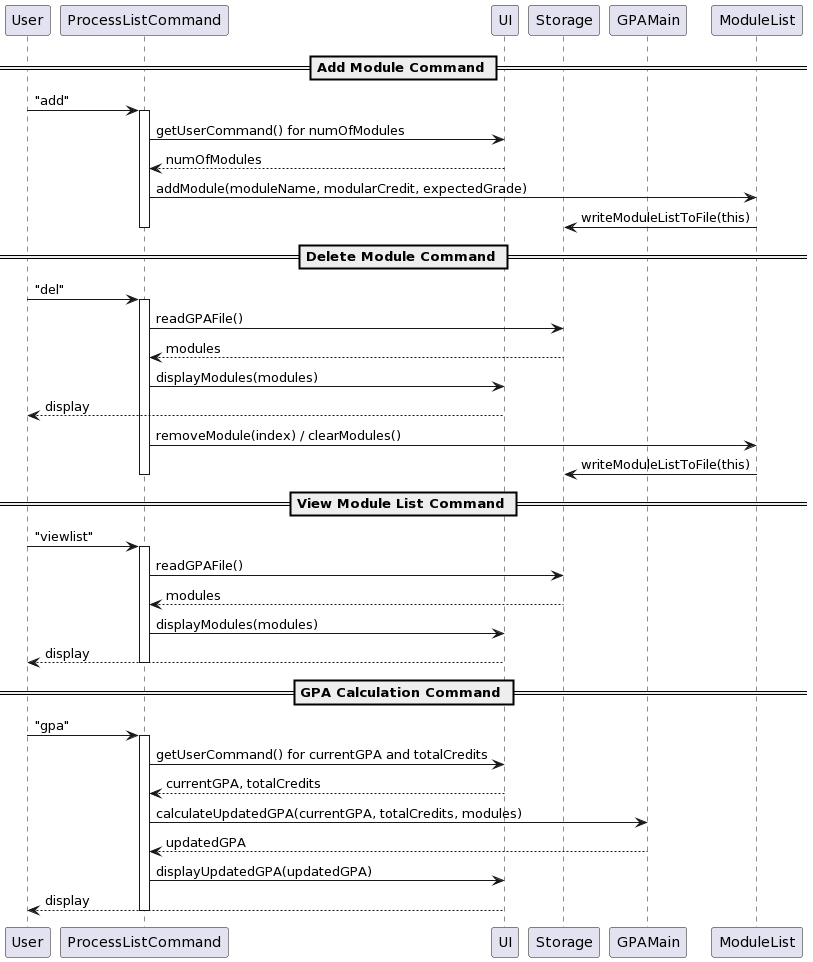
ProcessListCommand
This class is in charge of calculation of GPA by Module List method by identifying user’s input.
Workflow for step-by-step GPA calculator
Start/Exit Prompt:
Prompt the user to start the calculation or exit.
GPA and MCs Input:
Collect the user’s current GPA and the number of Modular Credits (MCs) taken.
Module Details Input:
For each module the user wants to add, collect the module name ,modular credit and the expected grade.
GPA Calculation:
Calls GPAMain.calculateNewGPA to compute the updated GPA based on inputs.
Display Updated GPA:
Displays the calculated updated GPA to the user.
Workflow for module list GPA calculator
Adding module
User can access this via add command.
Store Module information into txt file
Modules information will be stored into the gpa.txt file in data folder.
Delete/Edit modules list
User can access this function via del command. User will be prompt to either delete specific module
information, or to clear the whole module list.
View Current Module List
Can be accessed via viewlist command. Current module list information will be printed out 1 by 1.
GPA calculation
Can be accessed via gpa command.
After prompted to input current GPA and numbers of MC taken.
The program will automatically output the GPA based on the information store in the Module List.
User is prompt to edit the module list first before proceed with calculation.
Key Methods
calculateNewGPA()
input: double currentGPA, int totalAccumulatedCredits, int numOfModules, int[] moduleCredits, String[] moduleGrades Calculates and returns the updated GPA.
GPA Calculation Logic
Total Points Calculation:
Calculates the total points achieved so far by multiplying the current GPA by the total accumulated credits.
Add Points for New Modules:
For each new module, add to the total points based on the grade and credits.
Calculate Updated GPA:
Divide the total points by the new total credits (accumulated + new modules) to get the updated GPA.
Back to table of contents
Mathematical Graph Demo
Overview
The Graph Demo function uses JPanel , which is a simple GUI tool in javax.swing package. With pre-written formula and defined size of parameters, therefore we can demonstrate the mathematical formula with illustration.
Class Diagram
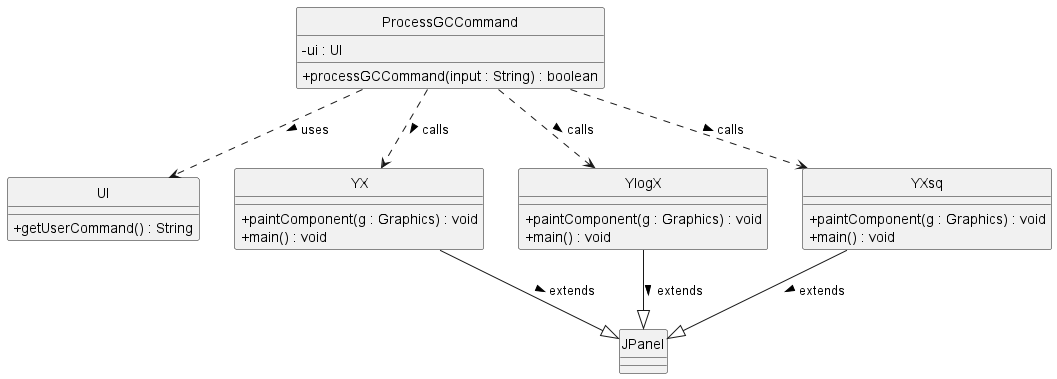
Classes and Methods:
ProcessGCCommand: Manages user commands to trigger specific graphical displays or other functionalities.UI: Provides a method to get user commands from the console.YX,YlogX,YXsq: Each of these classes extends JPanel and includes methods to paint specific mathematical graphs (y = x, y = log(x), and y = x^2, respectively) and a main method to create and show a JFrame displaying the graph.
Relationships:
- Dependency: ProcessGCCommand depends on UI to receive user input.
- Association: Indicates that ProcessGCCommand can call methods in the
YX,YlogX, andYXsqclasses based on user input.
Inheritance:
- Each graph class (
YX,YlogX,YXsq) is shown to inherit from JPanel, signifying that they are specialized panels used for drawing specific types of graphs.
Sequence Diagram
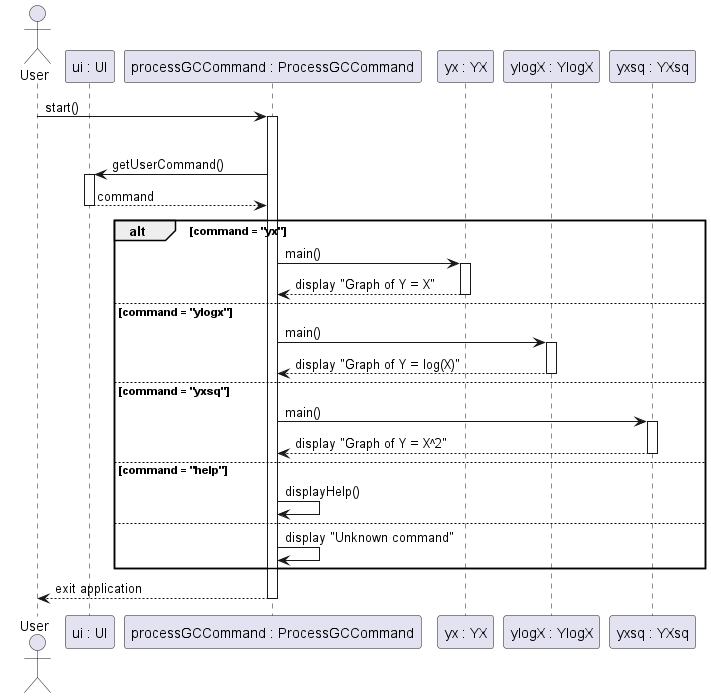
How GC works:
ProcessGCCommandutilizes the UI class to continuously fetch user commands.- Inside the
ProcessGCCommand, a loop runs awaiting commands from theUI. - Once a command is received, it’s processed in a switch-case structure:
yx: If the command isyx, theProcessGCCommandinvokesYX.main(), which sets up and displays a JFrame with the graph y = x.ylogx: If the command isylogx, it callsYlogX.main(), which displays the graph y = log(x).yxsq: If the command isyxsq, it triggersYXsq.main(), showing the graph y = x^2.exit: Theexitcommand breaks the loop and typically closes the application or returns to a previous menu.help: Displays available commands, which helps users understand what commands are available.
- Each graph class (
YX,YlogX,YXsq) extends JPanel, which is crucial for drawing the graphs. They override thepaintComponent(Graphics g)method where the actual drawing logic is implemented:- These methods set up the graph axes and draw the respective mathematical functions using Java’s Graphics API.
- When
main()is called on any of these classes, a JFrame is instantiated, the respective JPanel (graph) is added, and the frame is displayed.
- Users see the JFrame pop up with the desired graph and can close it or return to enter another command.
This cycle continues until the
exitcommand is processed
Back to table of contents
Timetable Tracker
The timetable tracker facilitates the management of class schedules. It aims to provide users with a convenient way to organize and track their classes throughout the week. Users can add, delete, and view classes based on specific days, enabling efficient scheduling and time management enhancing the overall productivity and organization of users.
The TimetableParser class is responsible for parsing commands related
to timetable tracker and calling the respective methods in timetableList.
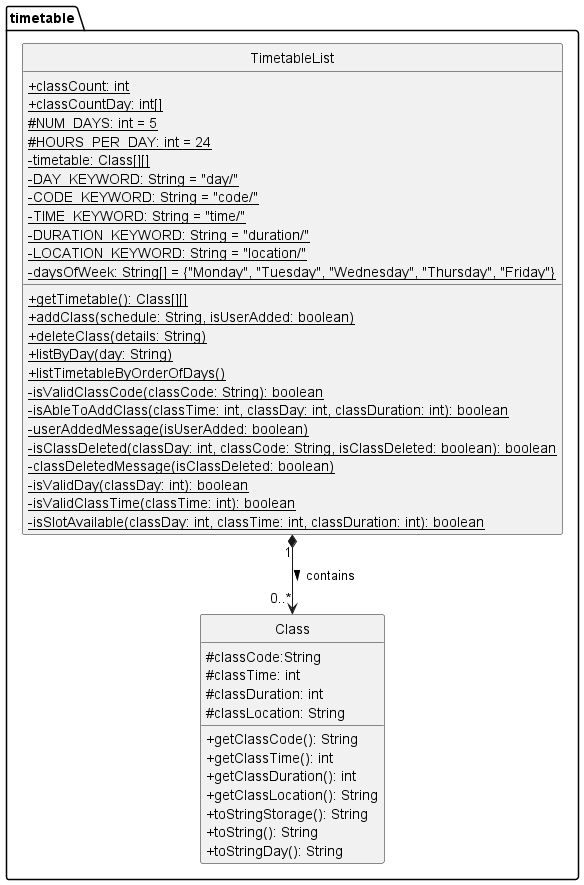
The TimetableList class is responsible for managing a collection of classes.
It provides methods for adding, deleting and listing timetable. TimetableList makes
use of a 2d array to store the classes, an array for each weekday and an internal array
for each hour of the day.
The Class class represents individual class instance within the system.
Each class object contains key attributes such as code, time, duration and location.
The class diagram below illustrates the relationship between TimetableList and Class class.
Class Diagram
How Timetable works:
- When a new class is added,
TimetableListcreates a newClassobject with the provided details and adds it to the timetableList based on the day and time of the class. This is repeated with a decreasing class duration and increasing class time until the class duration reaches 0. - When a class is deleted,
TimetableListiterates through the array for the day and looks for classes with the same class code as what the user input and deletes theClassobject from the 2d array. - When the timetable is listed for the whole week,
TimetableListiterates through the 2d array starting from monday, 00:00 and prints the details if there is a class. - When the timetable is listed for a specific day,
TimetableListiterates through the array for that day and prints the details if there is a class. - The isSlotAvailable(), isValidDay(), isValidClassTime(), isValidClassCode() and isAbleToAddClass() methods in
TimetableListare used to validate whether the user input is correct and whether there is any conflict with the existing timetable before the class is added or deleted from the array.
Design Considerations:
ASPECT: What the timetable list is store in.
- Alternative 1 (Current Choice): As a 2d array.
- Pros: Prevents Overlapping Classes: With a structured 2D array representing time slots, it’s easier to enforce constraints to prevent overlapping classes.
- Cons: Fixed Size: It might be less flexible if the timetable size needs to be adjusted dynamically. Not able to store timetable in half hours.
- Alternative 2: As 5 array list, 1 for each day.
- Pros: Flexibility: Each day’s timetable can be managed independently, providing more flexibility in adding, removing, or modifying classes.
- Cons: Indirect Access: Accessing elements might be slightly less efficient compared to direct indexing in a 2D array, as it involves traversing ArrayLists.
Add Class
Allows users to add classes to the timetable, provided there is no existing class already in the time slot.
Format: tt/ add/ day/ <day> code/ <classCode> time/ <hh> duration/ <duration> location/ <location>.
SequenceDiagram
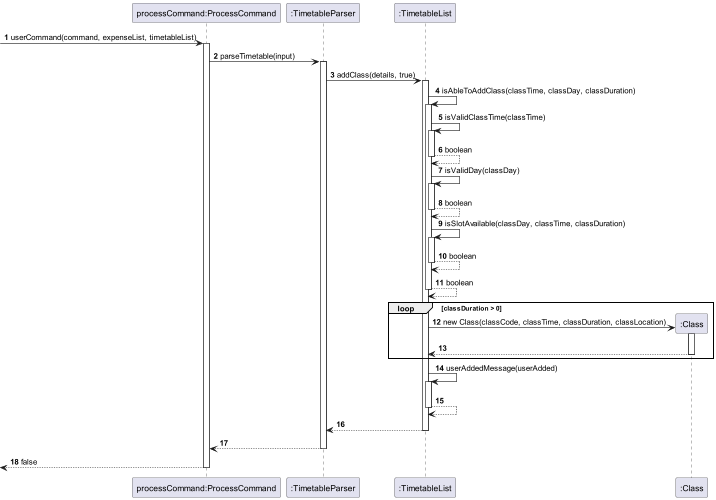
The sequence diagram above illustrates how TimetableList goes about validating user input and adding the new class.
List Class
View classes in order of day and time.
Format: tt/ list/.
SequenceDiagram
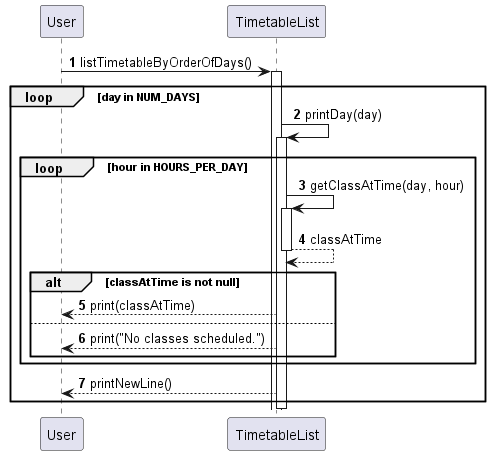
The sequence diagram above illustrates how TimetableList iterates through the 2d array to list the timetable.
List Class by day
View classes for a specific day.
Format: tt/ list -d/ <day>.
SequenceDiagram
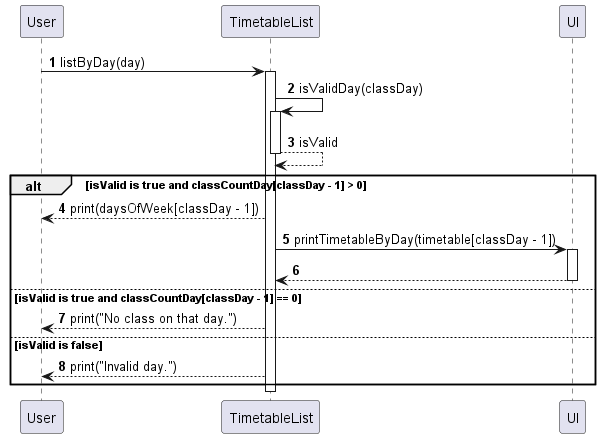
The sequence diagram above illustrates how TimetableList iterates through the array for the day
to list the timetable for the day.
Delete Class
Deletes all class on the day that has the same class code as the user input.
Format: tt/ del/ day/ <day> code/ <code>.
SequenceDiagram
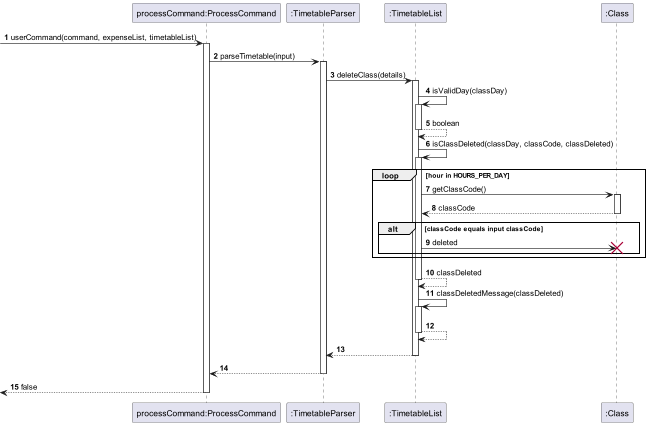
The sequence diagram above illustrates how TimetableList iterates through the array for the day to check for
similar class code before deleting the Class object from the array.
Back to table of contents
Motivational Quotes
The Motivational module prints a randomly generated motivational quote from the fixed array for the user whenever the program starts. It uses inbuilt random class from java.util to randomly generate an index to select the motivational quote to display
Class Diagram
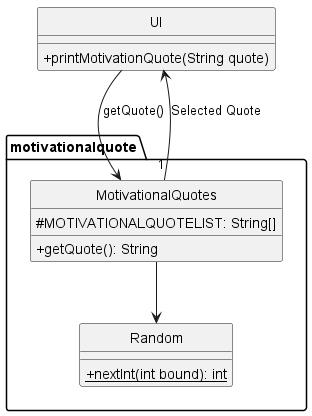
The class diagram above illustrates the classes associated with MotivationalQuites.
SequenceDiagram
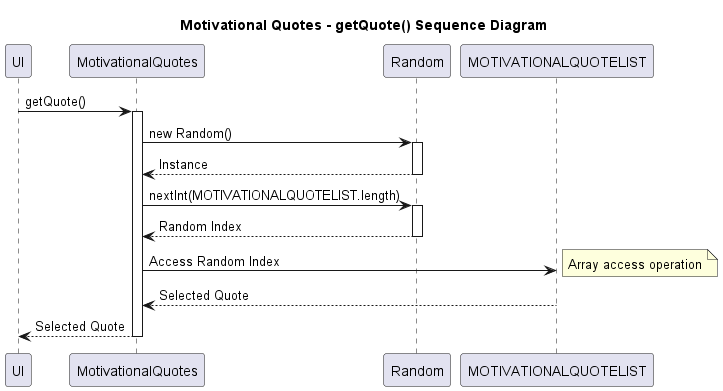
The sequence diagram above illustrates how MotivationalQuotes gets a random quote from the quote list.
Back to table of contents
Development Notes
Input Validation: Ensure that GPA scores and credit numbers are within valid ranges. This module expects a GPA between 0 and 5, and non-negative numbers for credits.
Error Handling: Properly handle invalid inputs, such as non-numeric values for credits or unsupported grade values.
Assertions: Use assertions to catch unexpected values during development. Ensure they are adequately handled or logged.
Future Enhancements
GUI Integration: Consider developing a graphical user interface for easier input and interaction.
Persistent Data: Implement functionality to save and retrieve historical GPA calculations.
Expanded Grade Scale: Allow for customization of the grade to GPA points mapping to accommodate different institutions’ grading scales.
Back to table of contents
Appendix
Product scope
Target user profile
- NUS Students
- Prefers typing
Value proposition
CantVas offers users the ability to efficiently monitor their expenses, enabling them to enhance their financial management skills. Additionally, students can utilize CantVas to calculate their GPA grades, facilitating academic success. With its versatile functionality, CantVas serves as a comprehensive 3-in-1 solution for users to manage expenditure, timetable, and GPA, thereby enhancing their overall organizational capabilities and productivity.
User Stories
| Version | As a … | I want to … | So that I can … |
|---|---|---|---|
| v1.0 | international student on a budget | use CantVas to add my purchases | meticulously record my expenses |
| v1.0 | analytical student | view a breakdown of his expenditures | focus on financial responsibility |
| v1.0 | budget-conscious student | view my expenses filtered by specific months and years | track my progress towards financial goals and identify any trends over time |
| v1.0 | long-term planner | see an overview of my expenditures grouped by year | evaluate my financial health and plan for future expenses accordingly |
| v1.0 | student who wants to start fresh | ability to delete all of my recorded expenditures | reset my financial tracking system and begin anew |
| v1.0 | careless user | delete wrong items in the expenditure tracker | add back the correct item in the expenditure tracker |
| v1.0 | user who needs assistance | be able to access help information within the application | understand how to use its features effectively |
| v1.0 | user finished with my tasks | be able to exit the application easily | close it and move on to other activities |
| v1.0 | Proactive business major | calculate my course grades on CantVas step by step | see which mod I have to SU |
| v1.0 | user who values user assistance | access help information and exit the GPA calculator easily | get assistance if needed and navigate the application seamlessly |
| v2.0 | organized student | add my expenses by type | understand where my money is going and make informed financial decisions |
| v2.0 | strategic spender | categorize and view my expenditures by type | identify areas where I can potentially cut costs or adjust my budget. |
| v2.0 | user seeking daily inspiration | see motivational quotes and tips CantVas provides at startup | stay motivated throughout her academic journey |
| v2.0 | student trying to organize my schedule | input my classes into the timetable tracker | keep track of the classes I have |
| v2.0 | student who needs to adjust my schedule | remove specific classes from my timetable | ensure the timetable accurately reflects my current commitments |
| v2.0 | student planning for the upcoming week | see all my classes scheduled for the week in one place | plan my study and extracurricular activities efficiently |
| v2.0 | student organizing my daily tasks | check my classes for a specific day | focus on the tasks and commitments for that day without feeling overwhelmed |
| v2.0 | meticulous user | add modules to the list by inputting their details | maintain a comprehensive record of all the modules I’ve taken for GPA calculation |
| v2.0 | detail-oriented student | edit the module list by deleting then adding | ensure the accuracy of my GPA calculation |
| v2.0 | student who overloaded | have a module list that keeps track of the modules I am taking | view the grades for each module |
| v2.0 | student who forgot my basics | see a graph demo | so that I can remember how mathematical equations are like in graphical form |
Back to table of contents
Non-Functional Requirements
- Should be portable and working on any mainstream OS as long as it has Java 11 or above installed.
- Should be able to hold up to 1000 or more expenditure without any change in performance of CantVas.
- Should be able to handle exceptions and edge cases for smooth operation.
- A user with an average typing speed in regular English text (not code or system admin commands) should find that they can complete most tasks more quickly using text commands rather than relying on the mouse.
- Comprehensive unit tests should be implemented within the application to guarantee accurate functionality, streamline maintenance, and facilitate future enhancements.
Glossary
- Mainstream OS: Windows, Linux, Unix, macOS
Instructions for manual testing
Given below are instructions on how to test the app manually.
Please remember to include spaces between each input when using the commands to ensure proper functionality.
Launch and Shutdown
- Initial launch
- Download the jar file and copy into an empty folder
- Open a terminal and change directory to the folder created with the jar file inside and type java -jar CantVas.jar into the terminal.
- Shutdown
- When CantVas is running, type
exitto close CantVas.
- When CantVas is running, type
Show help
- Prerequisites: NIL
-
Test case 1:
helpExpected: All commands and their format will be shown.
Expenditure Tracker
Adding expenditure
- Prerequisites: NIL
-
Test Case 1:
e/ add/ d/ shopping amt/ 128.00 date/ 31.03.2024Expected: A new expenditure with type NA is added successfully.
-
Test case 2:
e/ add/ d/ spider-man tickets t/ movie amt/ 13.50 date/ 12.02.2024Expected: A new expenditure with type MOVIE is added successfully.
View Expenditure
- Prerequisites: Added the 2 expenditure in Adding Expenditure
-
Test case 1:
e/ list/Expected: The current expenditure list will be shown along with the total expenses.
-
Test case 2:
e/ view/ m/ 03.2024Expected: The expenditure list for 03.2024 will be shown, at least 1 should be the shopping expenditure previously added.
-
Test case 3:
e/ view/ y/ 2024Expected: The expenditure list for 2024 will be shown, the 2 previously add expenditure should be shown.
-
Test case 4:
e/ view/ t/ movieExpected: The expenditure list for type movie will be shown, at least 1 should be the spider-man tickets previously added.
Deleting expenditure
- Prerequisites: List all expenditure using
e/ list/ -
Test case 1:
e/ del/ 1Expected: The first expenditure in the list will be deleted and the details will be shown.
-
Test case 2:
e/ clearlist/Expected: The whole expenditure list should be cleared. No expenditure should be shown when
e/ list/is entered.
GPA Calculator
Method 1
- Prerequisites: Enter the step by step gpa calculator using
gpastepfollowed bygpato start the calculator. - Test case 1: Enter the following input for each prompt:
4.00/241n/CS1010 mc/4 gr/A+
Expected: Your updated GPA is: 4.14.
Method 2
- Prerequisites: Enter the advanced gpa calculator using
gpalist - Test case 1:
add- Enter the following input for each prompt:
2n/CS1010 mc/4 gr/A+n/CS1010 mc/4 gr/A+
Expected: 2 modules will be added.
- Enter the following input for each prompt:
-
Test case 2:
viewlistExpected: The 2 module just added should be seen.
-
Test case 3:
del, followed by1 - Test case 4:
gpa- Enter the following input for each prompt:
424
Expected: Your GPA is: 4.14
- Enter the following input for each prompt:
Mathematical Graph Demo
- Prerequisites: Enter the GC screen using
gc -
Test case 1:
YXExpected: Graph of Y = X should appear in an external screen.
-
Test case 2:
YlogXExpected: Graph of Y = log(X) should appear in an external screen.
-
Test case 3:
YXsqExpected: Graph of Y = X^2 should appear in an external screen.
Timetable Tracker
Adding class
- Prerequisites: NIL
-
Test case 1:
tt/ add/ day/ 5 code/ cs2113 time/ 16 duration/ 2 location/ LT16Expected: Class is added successfully with the correct day, code, time, duration and location.
-
Test case 2:
tt/ add/ day/ 2 code/ cs2113 time/ 10 duration/ 1 location/ COM1-0210Expected: Class is added successfully with the correct day, code, time, duration and location.
Viewing classes
- Prerequisites: Added the 2 classes in Adding class
-
Test case 1:
tt/ list/Expected: 1 class is shown on tuesday for cs2113 for a duration of 1 at 10, 2 class for cs2113 will be shown with decreasing duration to represent the time left before the class ends.
-
Test case 2:
tt/ list -d/ 5Expected: Friday timetable should be shown with the cs2113 class shown for 16:00 and 17:00.
Deleting class
- Prerequisites: List add classes using
tt/ list/, there should be cs2113 class on friday. -
Test case 1:
tt/ del/ day/ 5 code/ cs2113Expected: The cs2113 class on friday should be deleted. No cs2113 class should be shown when
tt/ list -d/ 5is entered.